Requirements
Installation is done from Pikaj. In the Plugins window in Pikaj, press Install on the Pikaj Retouching row; Creative Cloud does the installing. The plugin is included in the Complete Bundle subscription at no extra cost and is also open during the 15-day free trial; it can also be bought on its own with a separate subscription (pricing). You can read about the product itself on the Pikaj Retouching page.
- PhotoshopPhotoshop 2024 (25.0) or later.
- PikajThe Pikaj desktop app installed on the same computer, open and signed in to your account. The panel connects to Pikaj on the computer itself.
- SubscriptionA Complete Bundle subscription, a Pikaj Retouching subscription or the 15-day free trial. If your account has none of these, the panel does not show the tools.
- DocumentRGB color mode, 8 or 16 bits per channel. The tools do not work in CMYK, Lab, Grayscale and 32-bit documents; convert the document to RGB first.
- FaceThe skin, eye, makeup and shape tools look for a face in the photo; the face must be at least 160 pixels wide.
- SizeFor jobs sent to Pikaj, the document can be at most 150 megapixels.
Step by step
-
Open the Plugins window in Pikaj
Open Pikaj and press the Pikaj Retouching card in the Adobe plugins section of Home, or choose Help ▸ Plugins (Photoshop, Premiere)…. The window shows whether Pikaj Retouching is installed on this computer, whether it is connected and whether your account includes it.
-
Press Install
The Install button on the Pikaj Retouching row opens the installation package that comes with Pikaj; Creative Cloud does the installation and asks for your approval. Restart Photoshop when it finishes. If the plugin is already installed, the row says Installed; if the Install button is missing, the note on the row tells you why.
-
Open the panel in Photoshop
In Photoshop, choose Plugins ▸ Pikaj Retouching. The first time, the panel shows only a connection card; the tools appear after you connect.
-
Connect to Pikaj
Press the Connect to Pikaj button in the panel. You do not type a code: Pikaj opens (it is started if it is closed), you sign in to Pikaj if needed, then Pikaj hides itself and you return to Photoshop. The connection is made once; the next time, the panel finds Pikaj on its own.
-
Open a photo and press a tool
Open the photo in Photoshop and press a button in the panel. The work is done on the active layer; if the active layer is not a plain pixel layer (an adjustment layer, a group, a smart object), a merged copy of what you see is made. The result arrives as a new layer or group whose name starts with “Pikaj ·”, with its mask; the original layer is not changed.
-
Adjust the result
In the bar at the bottom of the panel, the Strength slider is the opacity of the result; Before / after hides and shows the layer, and Delete removes it. You can correct the mask with Photoshop's brush. Every action is a single step in Photoshop's history: one Undo returns the document to how it was.
Tools in the panel
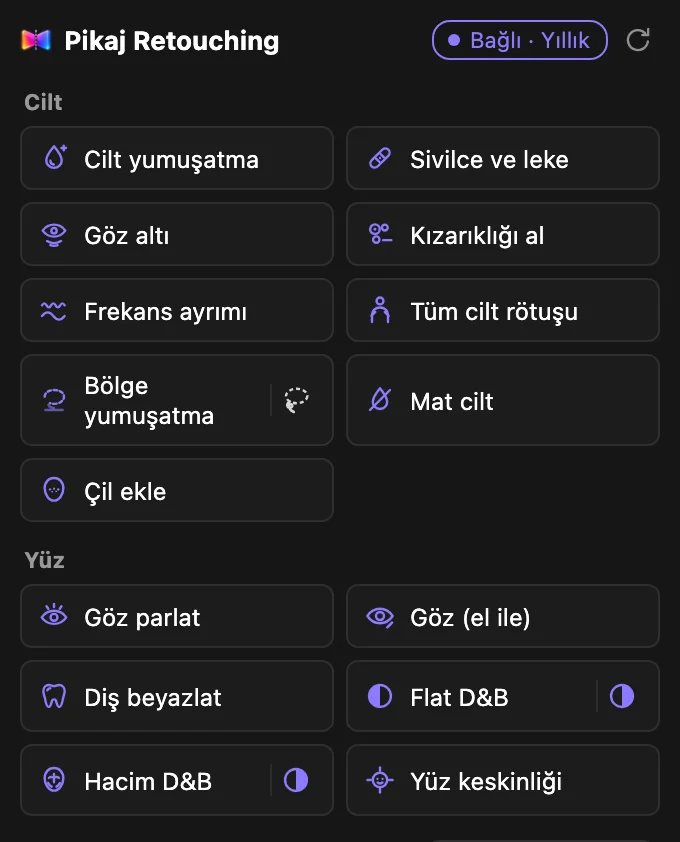
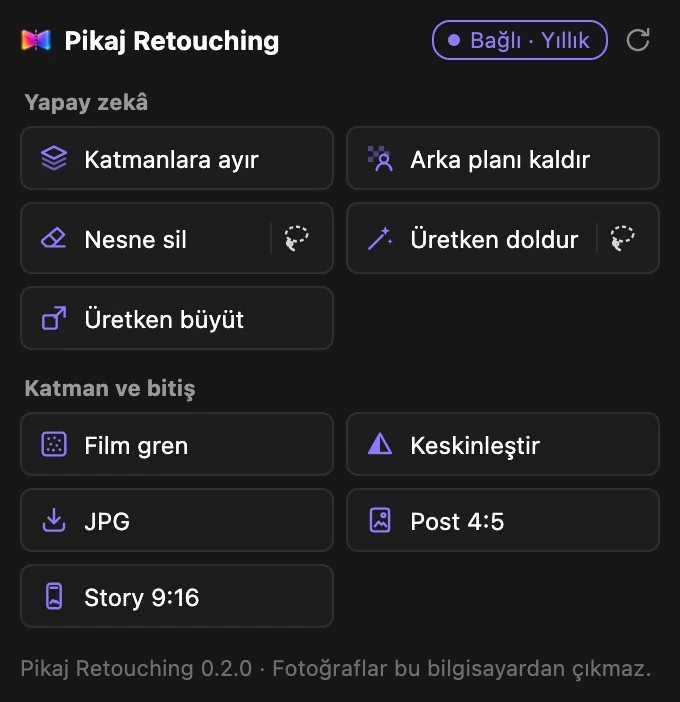
11 groups with 55 buttons and 16 composition principles. The images are from the real panel.
While the pointer is over a button, the line at the bottom of the panel says what that button does; the descriptions below follow those texts. Some buttons need a selection: Area smoothing, Remove object and Generative fill. The Lasso icon to the right of such a button selects the Lasso tool; you draw the area and then press the button. Sun rays can also be used without a selection; if you make a small selection, that spot is treated as the light source.
At the top of the panel
- Auto fixFixes the problems in the photo step by step, each on its own layer: tilt, white balance, exposure (opens dark photos, darkens bright ones; subject and background are judged separately), blemishes and spots, all skin (frequency separation; face included, one smoothing), skin saturation, skin tone, wedding-dress white, volume D&B, eyes, teeth, face sharpness. A step with nothing to fix is skipped and no layer is created; the Level selector sets the strength (Balanced: natural); hide or delete any layer you do not like from the group.
Skin
- Skin smoothingFull skin retouch: tone evening, smoothing, blemish and spot healing, under-eye; in close-ups, small red spots on the neck, chest and arms are healed too. Pore texture is largely kept; beard, moustache and the shape of the nose are not smoothed. Dark moles stay; freckles may fade slightly.
- BlemishesHeals blemishes and red spots on the face and on visible skin such as the neck, chest, shoulders and arms with the surrounding skin texture; moles, freckles and tattoos are kept. In wide shots only the face is processed.
- Under-eyeLightens dark circles and bruising under the eyes toward the surrounding skin.
- Reduce rednessEvens out red and yellow blotches in the skin; brightness and texture stay the same.
- Frequency separationSets up low and high frequency layers and smooths skin tone automatically; the texture layer stays as it is. The nose, eyes, brows, lips and beard are not smoothed. Paint black on the group mask to remove it from any area.
- Full-body skin retouchWorks with frequency separation: fine texture (pores) stays as is, tone and color blotches are corrected in the low frequencies. Applies to all the skin on the face, neck, arms and body; beard and moustache are left out, and the effect is halved on the face (Skin smoothing handles the face).
- Skin saturationCompares the saturation of the neck, arms and body skin with the face and adds masked Hue/Saturation layers over clearly oversaturated and dull areas. Adjust the amount in the layer's Properties panel and the area by painting the mask.
- Even skin toneFinds clearly reddened or yellowed areas on the neck, arms, hands and body and brings them toward the same person's face tone with masked Hue/Saturation layers. The natural tone difference between light and shadow is kept; for redness on the face use Remove redness. Adjust the value from the layer and the area from the mask.
- Match body to faceMatches neck, arm, hand and body skin to the color and brightness of the face: Hue/Saturation for hue differences, a Curves layer in Luminosity mode for clearly darker or lighter areas. Partial, so natural light and shadow remain; adjust the values in the layers.
- Area smoothingSmooths transitions (blotches, harsh light-to-shadow steps) inside the area you select with the Lasso; fine texture stays. Make a selection first.
- Matte skinReduces oily shine on the forehead, nose and cheekbones while keeping texture (a Curves layer that lowers highlights plus skin color, in a masked group).
- Add frecklesAdds naturally scattered freckles to the bridge of the nose and the cheeks (separate layer, Multiply mode). Each click gives a different pattern.
Face
- Brighten eyesCleans the whites of the eyes and sharpens the iris. Skipped behind sunglasses and on closed eyes.
- Eyes (manual)Separate masked layers for eye whites, iris, limbal ring, pupil and catchlight plus eye color: adjust each one, refine the masks with a brush. Pick the eye color from the palette.
- Whiten teethRemoves the yellow from teeth without touching gums or lips. The mouth must be open.
- Flat D&BMicro (flat) dodge & burn: finds and evens small tonal irregularities in the skin (blotches, texture shadows); sets up Dodge and Burn curves with ready masks. The small icon on the right toggles the D&B helper view.
- Volume D&BMacro dodge & burn: gives the face three dimensions. Strengthens the existing light; forehead center, nose bridge and cheekbone tops are lifted, cheek hollows, jawline and temples deepened. The small icon on the right toggles the D&B helper view.
- Sharpen featuresSharpens eyes, brows, lips and beard; leaves the skin untouched.
- D&B helper viewThe small icon to the right of the Flat D&B and Volume D&B buttons. On/off: adds black & white plus strong contrast on top so uneven light and shadow stand out while you paint on the D&B layers. Pikaj buttons ignore this view. Press again when done.
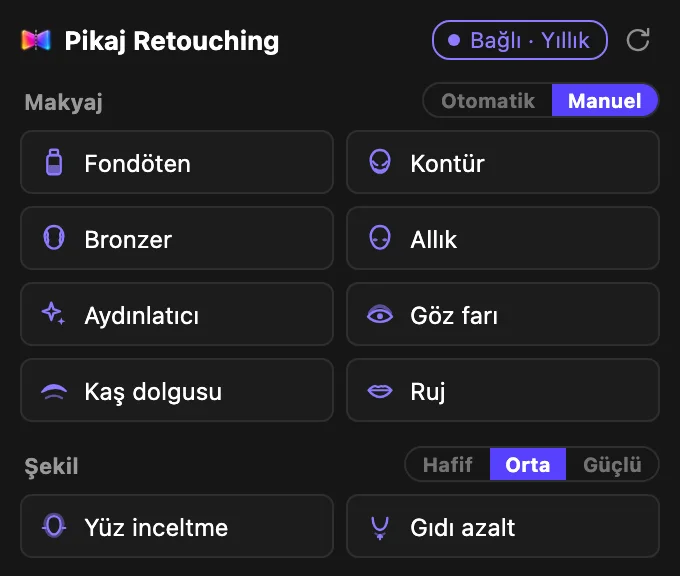
Makeup
- FoundationEvens the tone with the skin's own median color (Color mode): pinkness and blotchiness drop, texture and brightness stay.
- ContourContour shadow under the cheekbones, on the temples and along the jawline (Multiply mode).
- BronzerWarm bronze along the forehead edge, cheekbones and jawline (the "3" shape; Multiply mode).
- BlushBlush on the cheekbones in a shade matched to the skin tone (Color mode). Double-click the layer to change the color; refine the mask with a brush.
- HighlighterHighlight on the cheekbone tops, nose bridge, center of the forehead, chin tip and Cupid's bow (Screen mode).
- EyeshadowEyeshadow matched to the skin tone on the upper lid and outer corner (Multiply mode). Double-click the layer to change the color.
- Brow fillFills sparse areas with the brow's own color and defines the brows (Multiply mode).
- LipstickColor on the lips (Color mode: texture and shine are kept). Double-click the layer to change the color.
Selector in the group header: Auto / Manual (Manual at first). Automatic: Pikaj finds the area itself. Manual: the mask starts empty and you paint where it should apply.
When a Makeup or Eyes (manual) layer is added, a separate “Pikaj Makeup Palette” panel opens; you can move it next to the canvas. The first color is suggested to match the skin tone. A color you click with “Pick from photo” is applied to the layer automatically; Paint and Delete use a brush on the layer mask (white paints the makeup in, black erases it), and Strength is the layer's opacity. You can also change the color by double-clicking the layer.
Shape
- Face slimmingSlims the lower cheeks and jawline toward the face's axis; eyes, brows and lips stay in place. Choose the strength in the header.
- Reduce double chinTucks the fullness under the jawline upward; the jawline and face stay in place. Choose the strength in the header.
Selector in the group header: Light / Medium / Strong (Medium at first). Strength of the effect (pressing again applies the new strength; remove the old one with Delete).
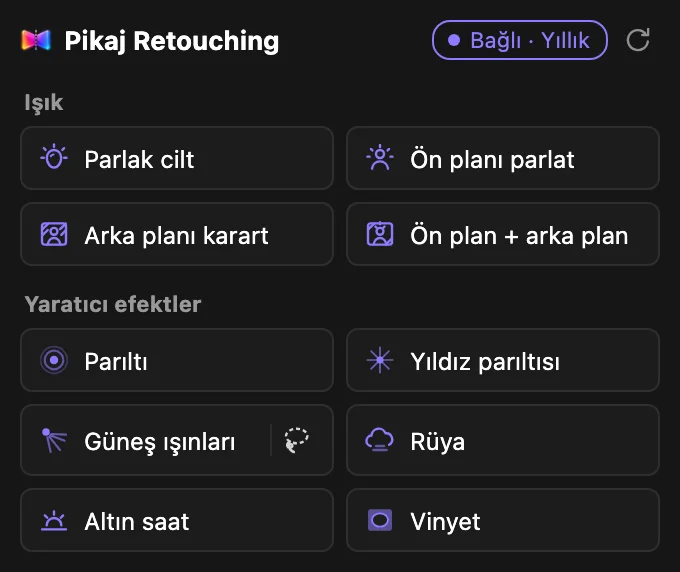
Light
- Skin glowBrightens and slightly warms only the bright areas of the skin (glowing skin). The outer group holds the skin mask, the inner group the highlights; refine either mask with a brush.
- Brighten subjectSelects the person and adds a masked Curves layer that brightens them; the background is left alone.
- Darken backgroundSelects the person and adds a masked Curves layer that darkens the background.
- Subject + backgroundBoth with a single button: the person is brightened and the background darkened (two masked Curves layers in a group).
Creative effects
- GlowSoft bloom on the highlights: bright areas are blurred and glow in Screen mode.
- Star sparkleTurns point lights (jewelry glints, bulbs, candles, reflections) into stars with a soft halo (Screen mode). The angle changes with every press.
- Sun raysRays streaming from the light source (sun, window) through gaps (Screen mode). To choose the source, make a small selection on it.
- DreamyOrton effect: a blurred copy in Soft Light mode for a dreamy glow and depth.
- Golden hourSunset warmth: a warm Photo Filter (luminosity preserved).
- VignetteSoftly darkens the edges to draw the eye to the subject (Curves + elliptical mask).
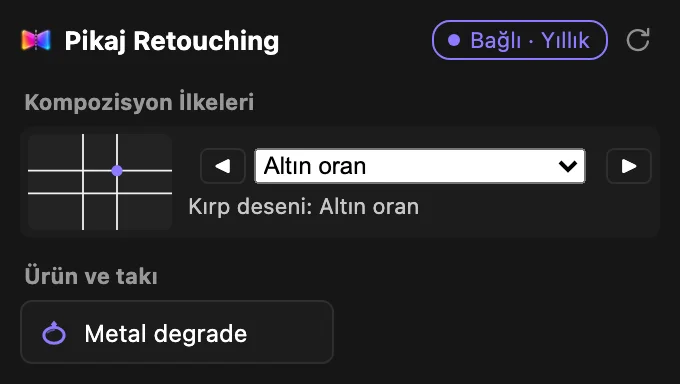
Composition Principles
This group has no buttons: you move between the 16 principles with the preview, the drop-down list and ◀ ▶ (or the left and right arrow keys while the panel has focus). Each choice opens Photoshop's Crop tool, and the principle's pattern becomes the Crop tool's own guide overlay, moving with the crop frame; the pattern appears the first time you click the image. Apply the crop with Enter or cancel with Esc: the other buttons do not work while a crop is in progress. No layer is added to the document.
- Golden RatioPlace the subject on one of the four points where the 0.382 / 0.618 lines cross.
- Rule of ThirdsDivide the frame 3×3; keep the subject and horizon on these lines or their intersections.
- Fibonacci SpiralPut the spiral's eye on the most important part of the subject (the eyes); the viewer's gaze follows the spiral.
- SymmetryThe center lines show the balance of the two halves; strong for reflections and architecture.
- Centered CompositionThe subject sits in the exact center; works best in portraits with a direct gaze and a plain background.
- Diagonal CompositionPlace important lines and subjects on the diagonals (and the lines perpendicular to them): adds movement and tension.
- Leading LinesLet lines such as roads, fences or light carry the eye to the subject; the lines meet at the focal point.
- Negative SpaceKeep the subject a small part of the frame; generous empty space makes it stand out. The marked box is the suggested subject size.
- Frame Within a FrameLet a natural frame such as a door, window or branch surround the subject; the inner frame shows the suggested area.
- DepthUse foreground, middle ground and background together; the three bands show these layers.
- Visual BalanceBalance a heavy element with a smaller one on the opposite side; the middle line is the balance axis.
- Visual HierarchyThe eye goes first to the largest, brightest, sharpest element; make the main subject first and supporting elements second.
- Rhythm & RepetitionArrange repeating elements at even intervals; a single element that breaks the rhythm draws attention.
- PerspectiveParallel lines meet at the vanishing point; place the vanishing point near the subject.
- S-Curve CompositionLet a road, river or body pose flow in an S shape; gives graceful, fluid movement.
- Triangular CompositionArrange elements (e.g. heads in a group photo) at the corners of a triangle; gives solidity and stability.
Product & jewelry
- Metal gradientJewelry and product shots: separates metal surfaces (gold, silver) and builds a gradient on each from the metal's own dark and light tones; stones are left alone. If there is a selection it is used as the product, otherwise Select Subject.
AI
- Split into layersSplits the person into named layers: hair, face skin, body skin, clothes, brows, eye whites, irises, lips, teeth, background. The image doesn't change; edit each layer separately.
- Remove backgroundRuns Photoshop's Remove Background on a stamped copy: the person or product stays, the background is hidden with a mask. Your original layers are untouched.
- Remove objectFills your selection from its surroundings with Content-Aware Fill (runs locally, uses no Adobe credits). Select the area first with the Lasso or Object Selection tool.
- DistractionsPrepares Photoshop's Remove tool "Find distractions": adds an empty layer on top and selects the Remove tool; you start the search from the options bar (Photoshop 2025 and later).
- Generative fillRegenerates the selected area with Adobe Firefly (runs in the Adobe cloud and uses generative credits from your Adobe account). If you don't like the result, check the other variations in the layer's Properties panel. Draw the selection close to the object.
- Generative upscaleUpscales the image 2x with Adobe Firefly and opens it as a new document (Adobe cloud, generative credits).
Layers and finish
- Film grainAdds fine film grain (Soft Light layer).
- SharpenApplies High Pass to a stamped copy of the visible image (Overlay layer).
- Check layersOn/off: adds Solar curve, Perceptual gray and Saturation check layers in one group; they exaggerate blemishes, rough transitions and color blotches. Pikaj buttons and export ignore them. Press again when you are done.
- JPGFull-size JPEG (sRGB, maximum quality). Your document does not change.
- Print JPGFull-size JPEG sharpened for print (radius by resolution; 1 pixel at 300 ppi). Judge print sharpness on paper, not on screen. Your document does not change.
- Post 4:5Instagram post 1080×1350; centers the face.
- Story 9:16Instagram story 1080×1920; centers the face.
Clothes
- Wedding-dress whiteMeasures the blue, green or pink cast in white clothing (wedding dress, shirt) and neutralizes it with a masked channel Curves layer; compresses blown highlights too. Cream and ivory are not meant to be white: reduce with Strength.
- Clothing wrinklesSoftens the light-to-shadow transitions of coarse folds in clothing; fabric texture, lace, seams and print edges are kept. Some volume is lost too: bring it back with Volume D&B if needed. A white bouquet or flowers may end up in the mask: correct it with a brush.
Common messages
On the left, the message or status you see on screen; on the right, what to do.
- Not connectedPress “Connect to Pikaj” in the panel. If Pikaj is not installed on this computer, the “Don't have Pikaj? Download it” link under the card opens the download page.
- Couldn't open PikajPikaj does not seem to be installed on this computer: download and install it, then connect again.
- Pikaj didn't connectPikaj did not open within five minutes or did not receive the connection. Make sure Pikaj is open and try again.
- Pikaj is closedThe tools work while Pikaj is open. Press “Open Pikaj”; when Pikaj opens, the tools appear on their own.
- Sign in to PikajThere is no session in Pikaj, or the subscription or trial has ended. Press “Open Pikaj” and sign in; the tools open when there is a valid subscription or trial.
- Not on this accountYour account has no Complete Bundle or Pikaj Retouching subscription or trial. The My account button opens your account page in the browser.
- Not connected to Pikaj. Connect again.The connection was cut in the Plugins window in Pikaj. Press “Connect to Pikaj” in the panel again.
- No face was found in the photo.The skin, eye, makeup and shape tools need a photo in which a face is visible.
- The face is too small to retouchThe face is less than 160 pixels wide. Work with a higher-resolution copy.
- The teeth are not visible (mouth closed).Whiten teeth needs a photo with the mouth open.
- This works only on RGB documents.In Photoshop, convert the document to RGB with Image ▸ Mode ▸ RGB Color; reduce a 32-bit document to 8 or 16 bits.
- The document is too large (150 megapixels at most).Work with a reduced copy of the document.
- Pikaj is finishing another jobPikaj does one job at a time; try again in a few seconds.
- Photoshop is busy with another taskCropping, transforming or editing text is in progress. Finish it with Enter or Esc and try again.
Download Pikaj
Pikaj Retouching works with the Pikaj desktop app and its subscription. Try it free for 15 days; no card details are required.